Showing posts with label hand painted. Show all posts

Sunday, December 12, 2010

"Gazing Upward" - Acrylic Painting & Sand Dollar Pendant Set

Did you every hear that old expression, when it rains it pours?? That is about where I am in the world these days. So much seems to be going on all at once and I'm not really finding the time to stay up to date with blogging or even getting on the computer for that matter. A week of jury duty turned into being selected for a trial, which I thought I would have hated but I must admit to enjoying and being quite fascinated by the process. In short, I'm glad to have had this experience, I never thought I would hear myself utter those words, but there they are. All this fun of course has kept me away from painting as well so I've just been doing what I can, when I can. This chickadee is the second in my painting/pendant combo sets.
The chickadee is painted on an 8" x 8" gallery canvas that is 1 1/2" deep.
The matching pendant is painted on a 2" sand dollar.
This set is now in my Artfire shop: www.artfulcreationsbyruthwelter.artfire.com . Once my head comes up above water level again, I can start to think about Christmas....how can it already be 2 weeks away??

Friday, August 22, 2008

Tea & Roses Gothic Vintage Ceiling Tin

I just finished a new ceiling tin the other day, "Tea & Roses" done on a beautiful old gothic ceiling tin. I have found a few of these beauties and I snatched them right up when I saw them. I'm always keeping my eye out for new tins that will be a beautiful canvas to a new painting. This particular tin is 13 3/4" x 9 1/2".

The tin itself was in beautiful condition and all I had to do before I started painting, was apply a layer of acrylic gesso.

This one called out to me to have a teacup design painted on it so that is exactly what I went for. Each ceiling tin I come across is so different in style, design and architectual interest that no matter what I think I plan on doing, I do let the tin design dictate to me how I should proceed.

Sometimes I change my plans before I even start to paint, as I sit and think about the tin more and more. Other times I change directions while I'm painting or atleast, keep my options open to add something later if I need too. The cup is rimmed in gold and I decided I wanted some sweet little washy roses on the the cup along with some gold accent dots, to create a nice elegant teacup. Underneath the cup, resting on the table, is a piece of vintage lace.

I really wanted a butterfly to rest on the rim of the cup also....maybe the tea drinker is outside, having a tea party and this little butterfly happened to come along....who knows.

Of course framing the piece and adding to what makes this tin special, are the cascading roses, leaves and vines coming from the top and the sides.

In the end, I hope it is a piece that a tea lover as well as a lover of roses will appreciate. I will soon be listing this piece to my ETSY shop and also my website: http://www.artfulcreations.etsy.com/ .

Thursday, June 05, 2008

Spring Bluebird & Hydrangea Jewelry Box

I recently finished a custom order for a Spring Bluebird & Hydrangea jewelry box. The background for this pieces is a shade of lavender purple.

I painted the purple and blue Hydrangeas on the top of the box.

A leaf and some blooms spilling over the front and sides in a couple of places.

Of course a Bluebird box wouldn't be complete without the bird himself, perched on top of some Hydrangeas. This box was created for someone that loves Bluebirds!!

A little surprise on the inside lid!

Friday, November 23, 2007

Little Gray Kitty

My little gray kitty mailbox was a holiday order I shipped out last week. It is going to its new home, all the way to Belgium believe it or not.

I often get asked what I need to complete a pet portrait mailbox. All I need to do a proper job, are as many good quality photos as you can send via e-mail. I need as many close ups and different poses as you can come up with. Basically, the more good quality photos that you can send me, the better.

I doubt I will have much time in the next few weeks to work on my rose watercolor. Even though I'm yearning too, I have a slew of Christmas orders to complete and get shipped out so at the moment, those take priority. I hope to return to my watercolor over my Christmas vacation. This is when I take a much needed break from custom orders, to focus on what I would like to paint.... or sometimes, I paint nothing at all.

Wednesday, October 03, 2007

Emu Egg Butterfly Jewelry Box

I really ran a muck since my last post, I finished another jewelry box. This one I will be listing in my ETSY shop.

The star of this box is a butterfly that is perched on top of some burgandy, pink and yellow flowers.

This box opens to reveal a fabric lining, just as the brides box did. Rather then a curved horizontal cut, this one has a beautifully done straight cut. I have to thank Corinne for the beauty of these cuts because if she didn't do such a wonderful job with that part of it, it wouldn't look good no matter what subject matter was painted on it. Here you can see a close up of the hinge area.

I painted the whole box light pink, green & white, then built my design from there. The funny part way, I meant to leave it like the brides box that I painted, with the bottom half of the egg left its natural color. This however is where your best planned ideas go wrong. I was a bit sloppy with applying color to the top of the box, I really ended up having quite a bit of paint on the bottom half. I thought, hey no problem, I'll just wash it off and clean the bottom half up. Well, what a surprise, water, baby wipes, alcohol not even Goo Gone (which gets everything off any surface by the way) would work on this box. Turns out the shell is that heavily textured that, once you get too much paint on it, forget it, it's not coming off. This is where you have to be flexible in art and go with the flow. So, I decided that the whole box should be painted that base color, and so it was.

I also carried the design from the top half, to below the opening of the box on the bottom half. I really feel the design flows a lot better that way rather then forcing it to stay in one area. I really struggled with this box too....who knows why but it took me forever to get drawn out just the way I wanted it to be. Once it was though, I was able to dive right in and paint. From there on in it went pretty fast.

**I've decided that around mid month, each month, I'm going to be doing an "In The Spotlight" post on my blog. Here I will be featuring an artist whose work I love and greatly admire. I've got a long list of all different kinds of artists and craftspeople I plan on asking so I hope it will be a very varied display of work. I'll be posting my first artist next week so stay tuned. I hope you will all enjoy discovering some new and beautiful art work.

Saturday, November 25, 2006

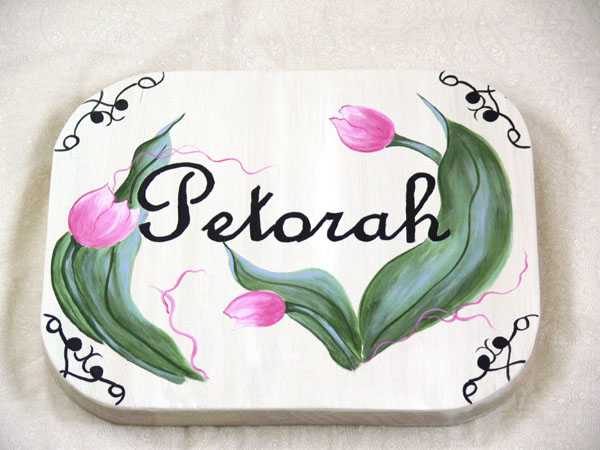
Custom Tulip Plaque


With the Christmas ordering craze, I feel I have fallen a little behind on my blogging. I thought I would remedy that tonight by posting a new custom piece.

This is a custom plaque that I just sent out last week to a very sweet customer. She contacted me to make a special piece for the stall door of her horse, Petorah. She really wanted a Dutch type theme and so we decided on pink tulips and some scroll work in each corner. The colors had to match that of Petorah's halter & blanket, which are pink and black. Hopefully Petorah will enjoy her new plaque.