Showing posts with label rose art. Show all posts

Monday, May 26, 2008

Shabby Chic Pink Roses Jewelry/Trinket box

I finished a brand new jewelry box the other day, I'm having a lot of fun painting these boxes. This one has a soft, large pink open rose and two buds just waiting to open up.


I've put some very washy pinks and greens on top of this light green background, just to give the hint of flowers and leaves in the distance.

The leaves and thorny stem carry around to the side and front of the box.

I'm putting a little surprise on the inside lid of every box I paint.....this one has some leaves.

This piece is available at my etsy shop: www.artfulcreations.etsy.com and will also be listed on my website soon.

Wednesday, April 30, 2008

Pink Rose Shabby Chic Jewelry/Trinket Box

I've been bitten by the bug to paint some jewelry boxes as of late and for my first one I wanted to paint a soft, pink rose.

I started with a wooden box that measures 7 1/4" square and 2 1/2" in depth. I painted the box a very light green, with some touches of white and lavender added here and there for good measure.

I distressed the box very lightly and once it was all cleaned up and ready to go, I planned the layout of my large, pink rose.

When I finished adding shadow leaves and some vague flower shapes and colors in the background, all around the box, I was ready to paint the rose iteself , along with the surrounding leaves and vines.


I didn't want to ignore the inside so I painted a little surprise when you open the lid. Chris then sprayed it with a protective coating so the design will last and stay beautiful. I really enjoyed this one and I actually just finished another.....a butterfly and hydrangea jewelry box. I think I feel a collection of painted boxes coming on. This piece is available at my ETSY shop: www.artfulcreations.etsy.com .

Wednesday, April 16, 2008

Beautiful Pink Rose Watercolor On Masonite Board

Do you remember this 11" x 14" watercolor?? I started it way back in November, got a bit side tracked with it ( I change directions so fast that sometimes I get whiplash ) and then went off to paint ceiling tins for a while, putting this aside to collect some dust. As you can see from the above though, I have finished it, just this week.

Here is what I started out with....some lovely rose photos that I took in my garden a few years back.

I never know what photos I will use or if I will use them, but it pays to save them all because then when inspiration hits, I'm ready. I decided to make this a pink rose, hence the color change.

I'm a huge fan of Georgia O'keeffe, I've fallen in love with her style and the beauty of all her floral works. Her work really inspired me for this painting and my Red Dahlia watercolor, which can be seen in the watercolor category to the right.

These of course, are just the beginning stages of the design. There really are so many steps and decisions to make along the way, that if I listed them all, we would be here forever reading this post.

I've got a lot more of the colors finished in this shot but still a lot more to do. This is when I really start seeing things take shape though, and the subject gets very exciting, it is starting to come to life.

A close up of the finished center of the rose. I ended up redefining and sharpening the edges and colors in areas that I thought needed it. When it was all finished, I had Chris spray it with a protective coating....it can now be hung on the wall as is, with the hook on the back, or put right into a standard frame.

I'll have to have my favorite webmaster put it up on my website this week. I'm glad I was motivated to pick it up again and finish it.
Last but certainly not least, you may have noticed my beautiful new blog. For this I can thank Sara over at Sadie Olive Design. She did such a beautiful job for me and was so professional and easy to deal with that she made this blog redesign a very pleasant experience. Be sure to check out all of her beautiful designs at: http://www.sadieolive.com/ .

Saturday, April 05, 2008

Antique Ceiling Tin Art In Action

Remember my Pink Passion Roses On Vintage Ceiling Tin?? It has gone all the way across the country, from New York to CA to live in the home of my friend Kathryn Bechen. http://www.kathrynbechenink.com/ .

Every once in awhile I am lucky enough to get to see my artwork in action, hanging in my customers homes. Kathryn was kind enough to share these photos with me of my ceiling tin hanging in her new home, in her new livingroom.

Getting to see your artwork in action really makes the creative process worthwhile. Thank you Kathryn for taking the time to send me these.

Photo taken by & copyright Kathryn Bechen Ink . Used with permission.

Friday, March 21, 2008

Rose Garden Pavilion Vintage Shabby Chic Ceiling Tin

I have finished my large ceiling tin, just today actually, I put the finishing touches on it. I'm very pleased with the way this one came out and all in all, it came together rather smoothly for me. I'm going to start you off at the beginning so you can see how the painting progressed.

This is what I started with, a blank and very large 24" x 24" ceiling tin. It is very ornate, with the beautiful wreath motif in the middle and elaborate edging, it really leant itself to a very elegant design with lots of possibilities.

For most everything I did on this tin, I used very wet paint on a dry surface. I sketched on the rose pavilion after my sky and grass areas were painted. Once the building itself was done, I started working on some of the far off rose bushes. Those are done by using lots of wet paint on a wet surface. The paint kind of mingles together and really creates a look of distance.

There wasn't a fence like this on the Vanderbilt property by the rose pavilion (You can refer to my working photo from my March 6th post) but that is the wonderful thing about art, I can change things around to suit my own purposes. I wanted another solid structure in the foreground so I cam up with this weathered fence. I love fences, walls and stone so don't be surprised if you see more of them in the future. I think they are beautiful architectural elements and can be used in so many different way.
I really needed something solid in the foreground to go next to the soft scape material I was putting in on the left side, they balance each other nicely. These roses, while still vague, are not like their relatives a little further back in the scene, they are starting to take some shape at this point. Again lots of wet paint on a wet background, with just a bit more of a definate shape.

I added lots of shading at the bottom of the scene, it really needed it, the darker color really anchors the scene down.
Didn't I tell you there would be a blue bird?? I didn't lie, there he is at the top of the scene, but outside of the scene , a nice large bird, pirched on his branch. I had a lot of ideas on how to approach this painting and this particular idea, believe it or not, came to me one day as I was vacuuming the bedroom carpet. : ) I wanted to create some elements outside of the rose garden scene, that were large and spilling into and out of the landscape.

At this point, I wanted to give the grassy area more of a pathway look to it so I added some lavender, pale blue and white for a lot more character and color.

To finish off the piece, I added 2 pink roses, spilling down on the lower part of the tin, cascading out of the scene. I think they balance with the blue bird nicely and both the roses and bird, I think, give the tin added dimention.
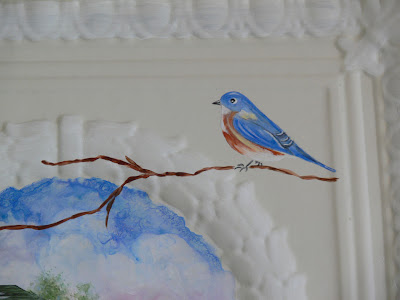
A close up of the little blue bird. I actually fussed over this little guy for quite a while, until I got him just the way I wanted him.

Ok, I lied, I wasn't quite done......I decided after a day of standing and looking at this tin from across the room that it needed something more. I had already, early on, painted the wreath shape in the middle, a nice clean white and I really liked the way that contrasted with the cream colored tin. I decided to do the same with the 2 outer borders as well.
Chris told me after that to just follow the KISS principal (keep it simple stupid), I had never heard that one before. Still, I don't know, it needed a bit more so I took a blue/gray color and did a dry brush effect around the two outer borders, most darkly though, around the edges. I'm glad I did it because I really like the way it looks now.
At this point I've got some orders to work on so, until next time.........

Sunday, March 02, 2008

Red Red Roses Vintage Shabby Chic Ceiling Tin

My newest piece, done on an antique ceiling tin, it measures 12 x 12. I had decided I needed to paint some luscious red roses for this one.

The rose to the right is a softer red and in fact, has many shades of red spread throughout. I also wanted to make this rose have a sunny look to it so I've added pale yellow to some of the petals. I was looking through a gardening catalog at the time and there are so many shades and varieties of red roses. I think that was my inspiration for the top rose.

With the rose on the left, I wanted to create a deeper more sultry look. I again used many shades and variations of red for the base and shading colors. There is some pink in there as well and I used white to make the rose "pop".

I've also got some greenery coming up underneath the blooms and as you can see, it starts outside my painting area and goes upward. Lots of light pink and white swirls in the background, perhaps they are vague roses you cannot really see. If you look around the border of this piece, I've also heavily distressed it to give it a time worn look.

It is now available on my ETSY site: http://www.artfulcreations.etsy.com/ . I hope this piece gets your thinking about your garden. Enjoy!!!

Saturday, February 02, 2008

Brilliant Pink Rose Vintage Ceiling Tin

Since I wrote last, I have finished another ceiling tin. This one I've entitled Brilliant Pink Rose because I really think it says..."Hey, look at me!) This particular bloom is maybe similar to some of the roses in your own yard, (well, when your yard isn't asleep for the winter but you get the point) it has just opened fully and will only be this way for a few days until it fades. The good thing about this particular rose is, it will never fade but will always be in full bloom.

I started out by sketching this rose one morning, again while sitting in my living room , having my caffeine fix for the moment.

I ended up painting the background a soft blue/white combination. I then decided I needed something more in the sketch besides the rose and leaves. I drew 2 buds as well as some thorny branches peeking out from under the rose. I felt this was just what I needed.

I also thought the edges of the tin needed a little something as well. I decided to make a frame of sorts for my rose. I painted the outside square a blue and white, the same as the background, the inside square is a soft lilac. When I was finished with this, I distressed each square a little by using a dry brush technique.

I was a bit too lazy this time to take "in progress" photos of my rose, I decided instead to just wait till it was totally finished before my camera was brought out. I really haven't had this much fun in a long time, being able to chart my own coarse and paint what I've wanted to create, has been so wonderful. The finished tin measure 12" x 12" and is available on me etsy shop at: http://www.artfulcreations.etsy.com/

Monday, January 14, 2008

Sweet Roses Antique Ceiling Tin

I painted this sweet little vintage tin just last week. I'm quite happy with the way this one came out. I also now have a whole stack of tins in my basement, they are just waiting for me to paint them.

I've listed this tin on one of my ETSY sites: http://www.artfulcreations.etsy.com/ . More information about the tin is listed there, along with price etc.

I'll be doing a lot more shabby chic art designs in the future. In fact, I have big plans for this year, big news actually, I'll be totally re-doing my website, http://www.artfulcreations.biz/ . In a few months time, it will look nothing like it does now, my husband (and webmaster) will be remaking it from scratch. This is due largely to the fact that I'll be taking my artwork and business, in a new direction.
The new design will be very sleek, elegant and straightforward. The new site will consist of 4 categories, watercolors, products made from those pieces, (such as jewelry boxes, framed tiles, mouse pads, you name it), elegant egg art and a brand new section for me that I'm really excited about, shabby chic ceiling tin art. My decorative art will be moved to one of my ETSY sites and there wiill be a link from my site, to the decorative art on my ETSY site. I'm also excited because I've hired my friend, Kathryn Bechen http://www.kathrynbechenink.com/ to write a new bio for me, for my new website. So, I'm going for a whole new look, time to spice things up and change them around. I'll be keeping everyone up to date on the progress. I know it will be quite a task for my husband but I know he'll do a great job.

I also wanted to mention, I have a new categories section, in the right hand column, right under my slide show. I've wanted a categories section for so long now because rather then leafing through year old posts to find what you want, you can now look under a specific category and see all the artwork listed there that applies. Enjoy!!!!

Saturday, November 03, 2007

Starting From Scratch Again

This is my least favorite part of beginning a new painting, starting from scratch. This photo above is one of my garden roses. I used it for inspiration on my rose jewelry box from the last post, and it will also be my reference photo for my watercolor rose that I'm just beginning.

After I decided what photo I wanted to use, I cropped it to focus on the area of the rose that I want to paint. This photo represents the exact layout I would like my painting to have. I then sketched the design on an 11 x 14 masonite board that I prepped with gesso.

This photo shows only the very beginning stages of work. I basically sat down last night and decided to lay some color on this board to just get it going. This is the hardest part for me, as I tend to procrastinate and put off starting to paint. Nothing is obviously finished or perfected, it's just the beginning of the project. I just based in some areas of the rose, decided on a background and also, thought I would add a leaf. What I will do in my next step, where I think I would like to pick up, is to finish the background properly, reshape the leaf and then start on the inside of the rose and work my way out. I'm also changing the color as well...the reference photo is of a creme colored rose and I'm making mine pink so, I'll be using some different colors. I'll try to work on this little by little and chip away at it inbetween holiday orders, which are already driving me a bit crazy. So, here we are at the start again, I hope you'll enjoy following along with the process.